Karen Gibbs Designs
  • Home
  • Contact
  • My Work
  • About
  • Journal
  • Store
  • Home
  • Contact
  • My Work
  • About
  • Journal
  • Store
Search by typing & pressing enter

YOUR CART

RSS Feed

Blog

Follow my blog with Bloglovin
Picture

Investigating and exploring things in the quilting and creative industries. I focus on the processes in batiks and using them in projects!

3/30/2021 0 Comments

Quilty Box Project: How to cut those Bargello Segments!

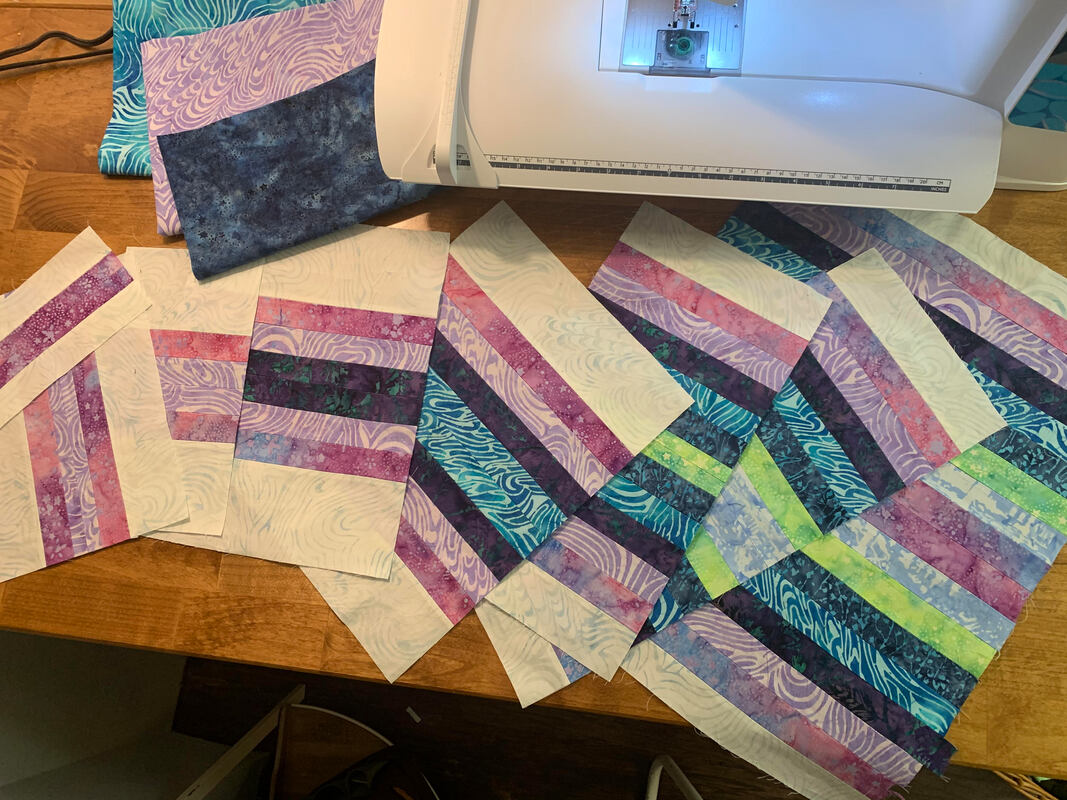
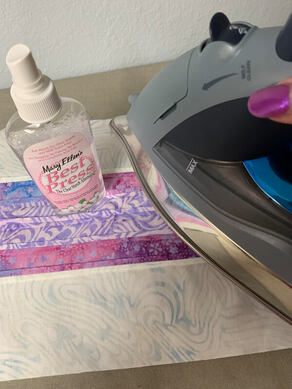
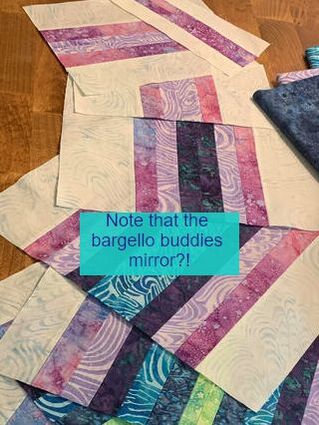
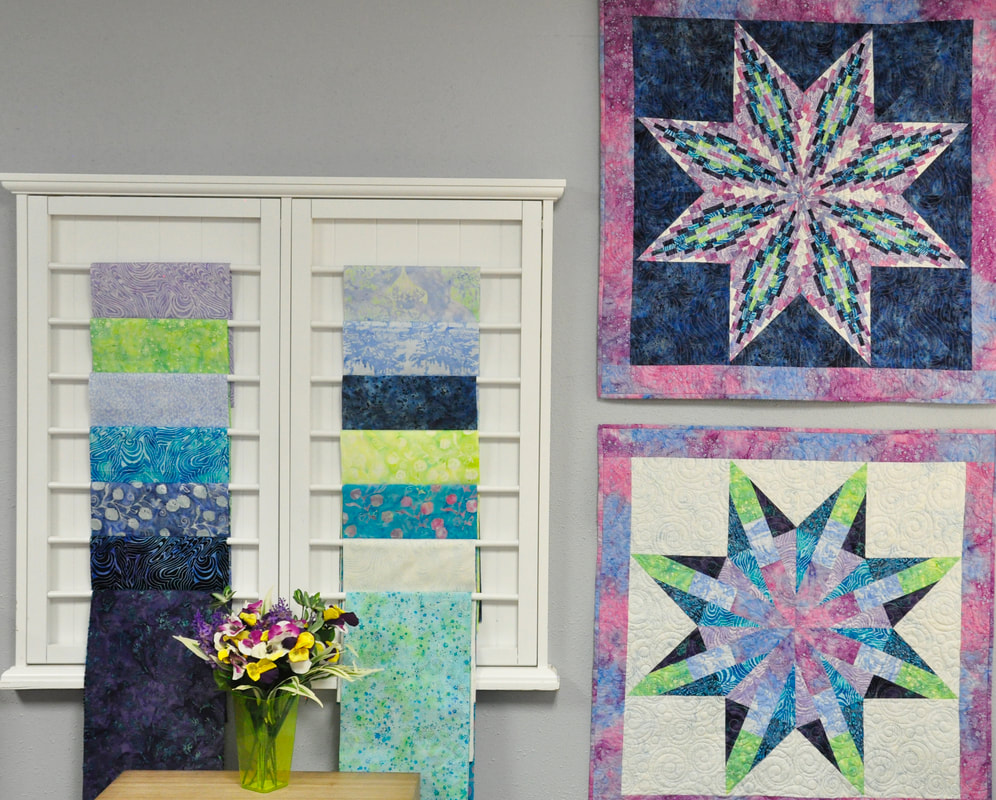
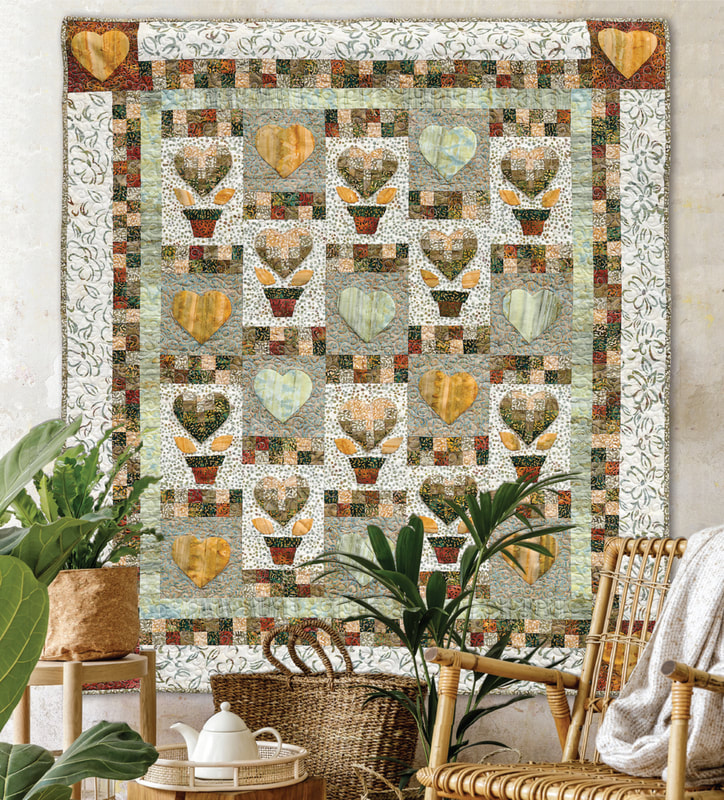
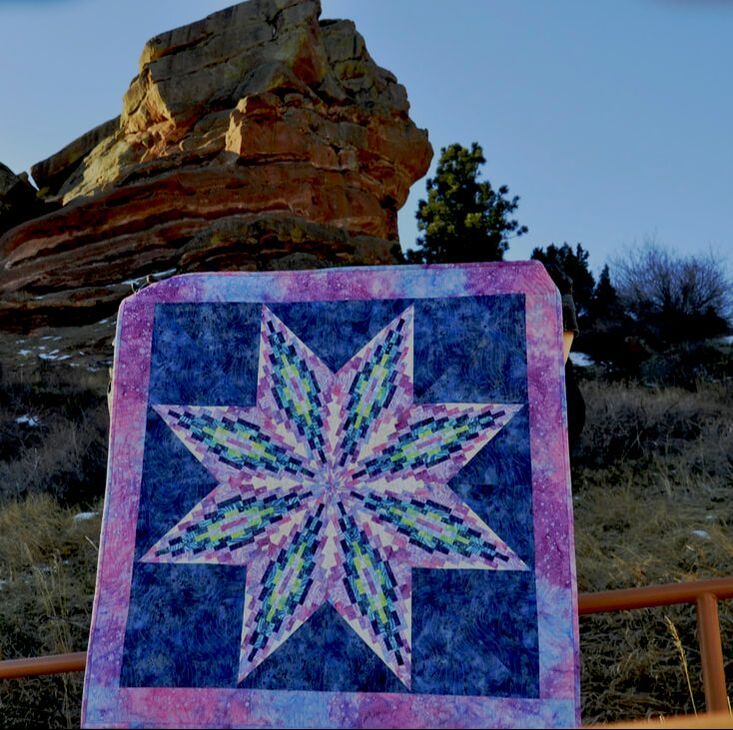
The March Quilty Box features the Olivia's Star pattern with my Northern Lights Collection. It's a mini with it's own set of directions and fabric requirements all laid out beautifully in the Quilty Box--grab one before they're gone! These tips work really well with the Madison's Star too, which is a full bed size quilt using 2-1/2" strips. Make sure you check out out that pattern as well!
Cutting those Bargello Segments!
​
0 Comments

3/27/2021 0 Comments

Quilty Box Project: Olivia's Star! Let's talk Strip Sets!

Grab your March Quilty Box and let's get piecing the Olivia's Star! If you haven't ordered one yet, you still have a chance to grab one before they're sold out. Click the button below and it will take you to the Quilty Box website.
March Quilty Box
Picture
There are 8 strip sets to assemble for this project
* I prefer to lay out my strip sets next to my sewing machine, starting on the bottom with Strip Set 1 (it will be the last one I sew together), next Strip Set 2, in a basketweave to Strip Set 1. (think strip set 1 strips go vertical, strip set 2, strips go horizontal) This keeps them nice and organized and I don't arbitrarily pick up extra strips from another set. Also, if they're next to my sewing machine, I can't mess them up in transport!
*Background strips are part of the strip sets. They are put in there so that we don't have to do any tubin, looping or seam ripping that is normally associated with bargello! Faster! Love that!
*Note that after I had you cut all those little strips, I have you sewing the same color back together again...YES!!! This is important!! This is the only seam in the whole diamond you have to line up, so bear with me on this!
Set your machine to a smaller stitch length!!!
 1.8-2.0 works best!!
​Scant 1/4" seams are important!
Picture
Press seams open! Makes it easier to quilt this, makes the peice lay flat too!
Picture
Use non-aerosol spray starch. It keeps the starch directed on the piece and not decorating your wall!!
Let's stay organized!

This project is designed to be easy enough for you to pick up where you left off if you get called away. Just stay organized!

Sewing Strip Sets
I have a couple tips that make sewing these strip sets easier. Try these methods and give me some feedback about what you think!

​*Strip sets are labelled 1-8. Actually label them! It can get confusing very quickly if you don't.


*You'll note in the pattern, I have you start cutting with Strip Set 8 as well as start sewing with Strip Set 8. There's a reason for that. It has the most bargello buddy strips in it. You have the most focus when you start a project, so I'm capitalizing on that!
Picture
The background is on either side of the bargello buddies, the same bargello buddy is sewn to itself for a mirro image!
*I like to string piece my strips together for each strip set. It keeps them in order and I don't cuut the thread inbetween them until AFTER I have pressed the seams and am sitting back down in front of my machine to sew more seams. 
*Assembling your strip set:
If you sew two by two's, press your seams, then sew sets of two together going the opposite way, you'll keep your strip sets from bowing.
*Pressing:
I have definite opinions about pressing and so will you when you go to quilt it! Press those seams open by doing the following:
   Set the seam with your iron, not scrubbing it, but think big elephant footprints stepping on the seam. 
   Open the seam with the nose of the iron, and press. Try to pull the strips from the end--once the seam is set this method should help pop them open.
   THEN spray starch and press the seam again. This will "glue" the seam open. (if you spray starch before you open it, it will glue it shut)
Get those strip sets done! Feel free to comment or reach out on the contact page if you get stuck!!

Next up! Cutting those strip sets into bargello segments
0 Comments

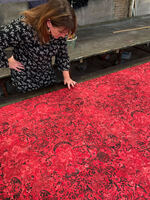
3/27/2021 0 Comments

Quilty Box featuring my batik collection and my pattern design: Northern Lights with Olivia's Star!
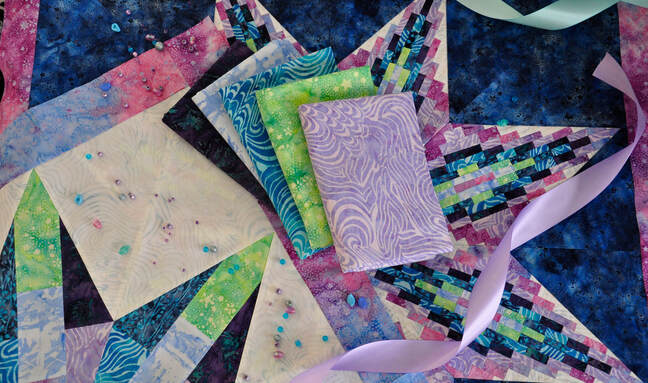
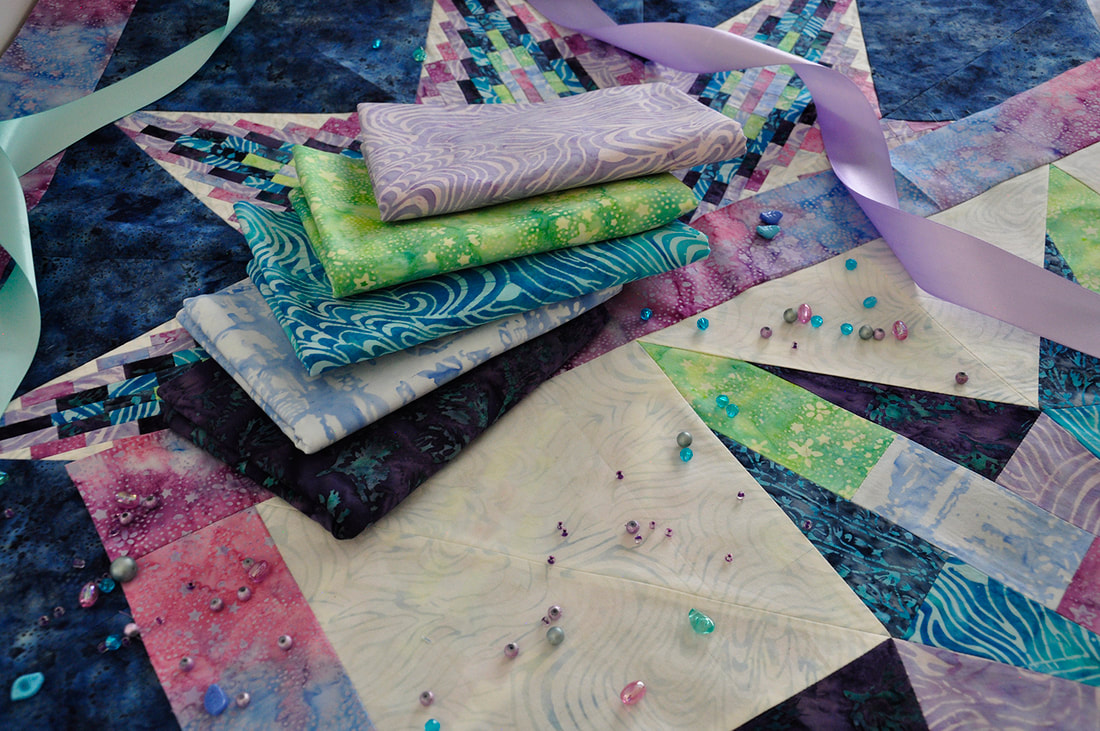
Picture

March Quilty Box features a double proud moment for me, the batik collection, Northern Lights I designed and the pattern Olivia's Star I designed!

To encourage completion of lots of Olivia's Star, I thought I'd put a few helpful tips and tutorials here so anyone can reference them. Currently, you can still grab a Quilty Box for March so click on the link and let's get going!!

Organization is key for an easy finish, so here's some quick tips to help!!

Bargello Buddies
*When you open your fat quarter bundle, you'll notice there are TWO light batiks. Those are what I refer to in the pattern as background. Background is NOT the setting fabric, in the photo that's the dark blue. This fabric you get to choose your own once your diamonds are made. It allows you to personalize it or choose a favorite color if you're giving this as a gift.

*The rest of the fat quarters are BARGELLO BUDDIES! What are bargello buddies??! They are the fabrics that go together in a bargello. You need 7 for this project and they need to be labelled A thru G. You do not have to keep them in the same order I did. If you are fond of the aqua color, move it to position A or B--those two will occur in every strip set which means every segment of the diamond, so the diamond will "read" that color more than anything else.

*Also remember, when you rearrange, Bargello Buddy A will be next to B, B will be next to C etc. A won't ever touch C or D. So when playing with these, if you don't like the certain colors together, they won't be! They just need a couple transition buddies that are fond of each other. Kind of like kids lining up for class. If you're a teacher, you may never put Billy in line next to Sam because there will be trouble, but if you put Tracy inbetween them, it all works out and everyone shines!


March Quilty Box!
Picture

So label your Bargello Buddies and lets get going!
Next up, Sewing strip sets!

0 Comments

3/14/2021 0 Comments

Heartflowers, published in American Quilter March 2021

Picture
Closeup before it gets quilted
What are you drawn to in a project?
I love a little of this, a little of that, probably not so fond of the projects that are endless blocks, all the same, just sitting at my machine sewing.

This project has a little bit of applique, a little bit of bargello, a little bit of reverse applique, a different kind of setting and not to huge to be intimidating. So take the Heartflower's challenge and give it a try! The pattern is in American Quilter March 2021. I'm teaching one class on it, at Quilter's Dream in Loveland, CO at the end of this month, join me!
Fabric Choices:
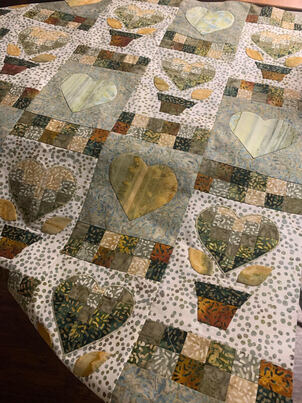
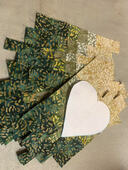
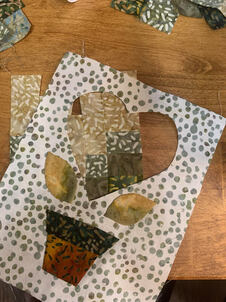
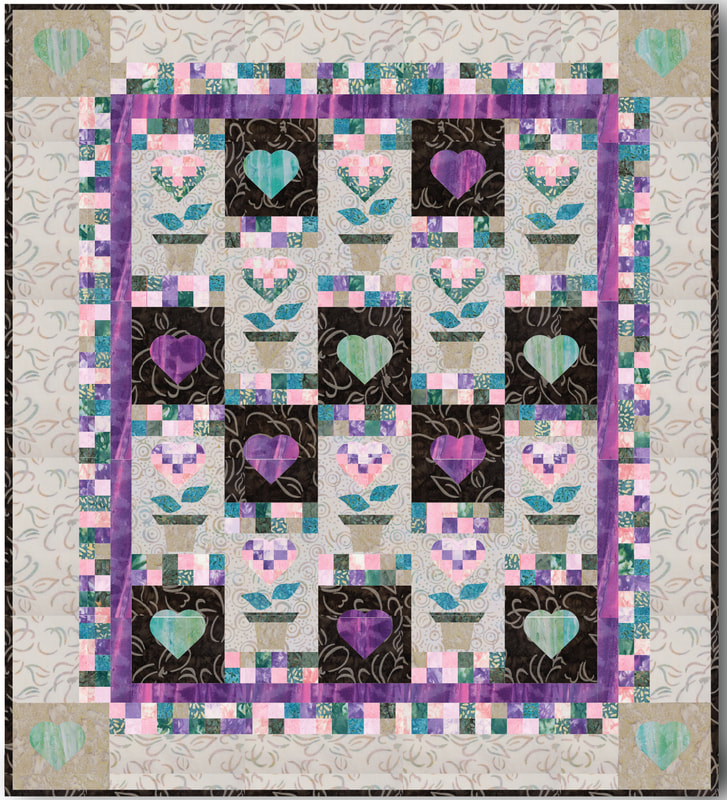
I chose to use Banyan Batiks Essentials because they're timeless, continuously available for anyone stumbling across this a little bit later and wanting to try. For exact fabric I chose, please send me an email. Also, scroll down a little, I'll make sure to show a second colorway in pastel colors. I liked the earth tones here, the rich colors we have been so drawn to in gardening the backgrounds that are the same color application in the batiks, but different motifs. The border, nice large bouncy style floral, the background for the heartflowers, a smaller dot, to support what's happening in the block. And of course check out the appliqued heart blocks with two of the Brush Strokes, a handpainted stripe in batik that is just gorgeous.
​
Bargello as Reverse applique!
My favorite way of adding color and movement to any project is with bargello. Bits of Bargello  (that's actually the title of my book I wrote on the subject. Visit my store page if you're intrigued and grab a copy!) Heartflower's gives you a taste of that, kind of like starting out gardening, you plant maybe a small planter box and see what you can achieve. In this project I created the bargello and then used it in a reverse applique technique, limiting the movement of the bargello to just the heart flower.
​
Bits of Bargello Book
Picture
In the pattern, the travel itinerary is given, small segments of bargello are created. It's not hugely important to match seams, you're just looking for eye catching intrigue of the movement of color. Note the bargello segment is bigger than the heart?? That's so you can have different looking hearts if you'd like. Also allows for smaller seams, or if you cut out a larger heart than I did! Beginner friendly!!
Picture
Bargello as reverse applique!
​Choices in Applique
I chose to applique my flower pot and leaves first, made the piece easier for my to hold and manipulate while doing hand applique. If you prefer machine applique for those pieces, you might want to get your bargello in place first, then the other pieces. One you cut that heart out, you've got to place the bargello there!!

Favorite Things
Speaking of cutting, my must have gadget for reverse applique bargello are the duck bill applique sissors. Easily trim for no shadowing and no risk in cutting the front! Because bargello has a lot of seams, traditional sissors don't work as well. Yes, I use them to trim behind hand applique as well. Have to have two uses for a favorit thing!!

    Love them!
​
Bargello has seen resurgence after resurgence in quilting as we embrace the movement of color it provides. A needlework technique, translated to quilting! Instead of doing an entire quilting in it, be more literal with the translation and just try it in certain areas of your piece. I've tried it in landscapes as reverse applique as well as in piecing to liven up areas of a quilt. 
Picture
Photo credits to American Quilter, truly capturing this project!!
Picture
Second Colorway option!
0 Comments

3/4/2021 0 Comments

I'm in Quilty Box!

Picture
So what's a Quilty Box?! It's a box of quilty goodies that will show up at your door each month of projects you get to explore!

You can sign up for one to try, maybe inspired by a designer you just love, or a subscription to expand your quilty toolbox each month. My box is shipping March 2021 and features my Northern Light Collection of batiks.

But what else is in it??! Well there's a special pattern created by the designer, especially for the Box, that showcases the wonderful fabrics, but also some favorite gadgets or tools the designer finds super useful.

​I actually chose TWO patterns and Quilty Box added a third one!! So you get a choice to try! And I'm a gadget girl, love to find a new gadget to try, but am rather finicky, want to make sure I can justify those gadgets. So gadgets need to hold up to at least two applications. 
Link to Quilty Box!
So Why the Northern Lights Collection??
This is such a color focused collection! It started with the thought of creating motion with color, in a batik, that reflects the idea of Northern Lights. Adding in a kind of galaxy design, to give the feel of a night sky too. The rich bright colors up against the dark night sky kind of colors is a favorite blend of batiks!!
Picture
Kaleidoscope Tool Tutorial
Check out one of the tools in the Box!! 
Picture
What projects are included?!
​Olivia's Star is one of them!! There is a couple other projects, one being a beginner style lone star and one being a paper pieced focused project.

But let's talk about this Olivia's Star! Olivia is my youngest, she's been asking for a quilt project to be named after her since Madison, her older sister got one. Madison's Star is the big girl version of this, using precut 2-1/2" strips, but is about 80". This one is a mini-me of that, which fits Olivia perfectly!

The pattern is laid out for your success, the tools I chose to go with this even helps you choose fabrics for this project (if you want to make a second one) as well as a tool to cut out those diamonds precisely.

A quick tip: the one thing you have to line up in those diamonds is the center seam, that's it!! And it's strip sets! So don't panic about the little pieces, it goes together super quickly!
Doesn't this sound like fun?! Celebrate March being National Quilting Month and give this a try! Once you have the center diamonds finished, you get to go shopping, whether it be in your stash or at your favorite local quilt shop for setting and border fabrics! How cool is that?! 
0 Comments

    Author

    Hello! I'm Karen Gibbs, the Design Director for Banyan Batiks, a quilter, a Momma,  crazy about food, cultures and an active lifestyle.

    Archives

    April 2021
    March 2021
    September 2020
    August 2020

    Categories

    All Announcements

Proudly powered by Weebly